

Use Thermal Imaging For Mold Detection: Complete Guide
Understanding Use Thermal Imaging For Mold Detection is essential. Thermal imaging has revolutionised how we detect hidden mould problems in buildings across Dubai and the UAE. When I first began exploring how to use thermal imaging for mould detection over a decade ago, I discovered that this technology provides a non-invasive window into building cavities where moisture and mould thrive unseen. The unique climate conditions in our region—with extreme humidity levels combined with aggressive air conditioning—create perfect environments for hidden mould growth that traditional visual inspections often miss.
Understanding how to use thermal imaging for mould detection properly requires both technical knowledge of the equipment and building science principles. Through my experience conducting thousands of inspections in Dubai villas and high-rises, I’ve developed systematic approaches that combine thermal imaging with moisture mapping and architectural analysis. This comprehensive guide will walk you through the entire process of how to use thermal imaging for mould detection, from equipment selection to interpretation techniques. This relates directly to Use Thermal Imaging For Mold Detection.
Many property owners in the UAE attempt DIY mould detection but make critical mistakes in thermal imaging interpretation. The key to successfully learning how to use thermal imaging for mould detection lies in understanding that you’re not actually detecting mould directly—you’re identifying the moisture conditions that enable mould growth. This distinction is crucial because temperature anomalies can have multiple causes, and proper interpretation requires contextual understanding of building physics. When considering Use Thermal Imaging For Mold Detection, this becomes clear.
Use Thermal Imaging For Mold Detection – Understanding Thermal Imaging for Mold Detection
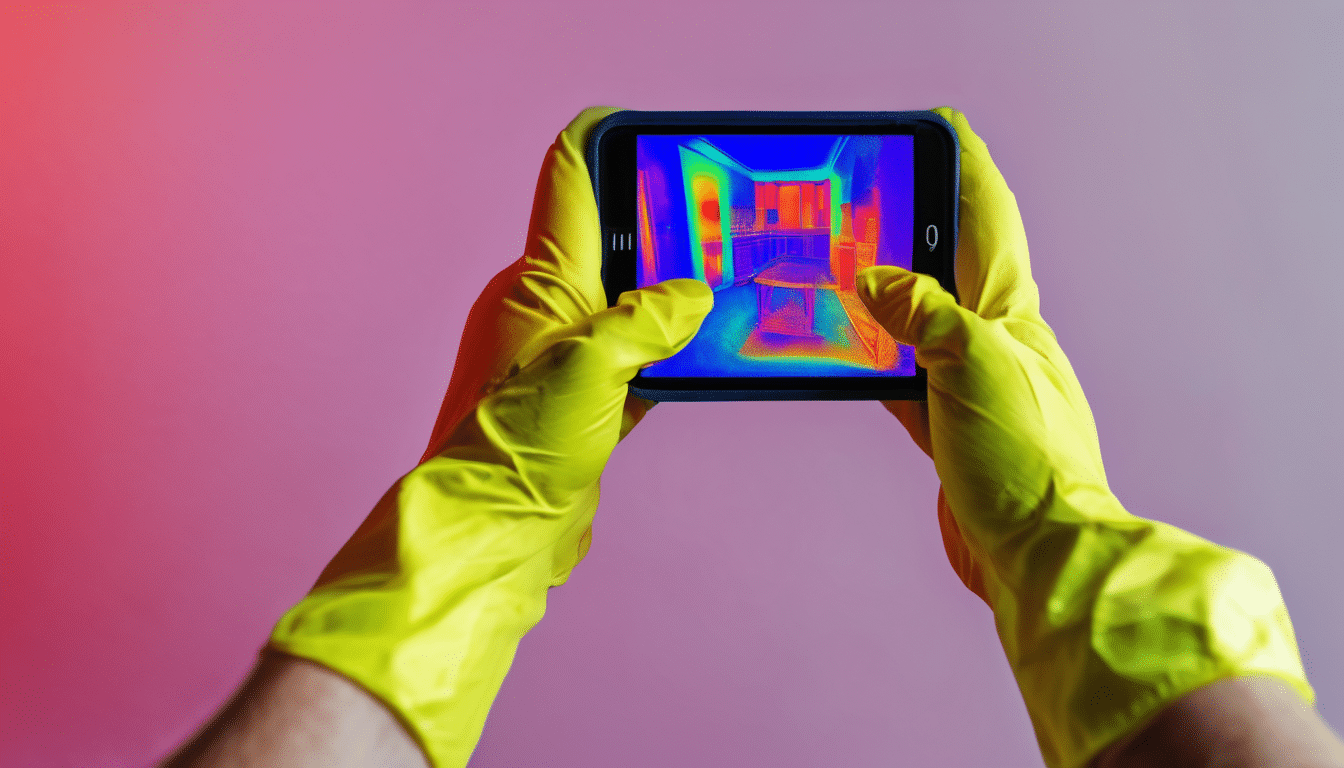
Learning how to use thermal imaging for mould detection begins with understanding the fundamental principle behind this technology. Thermal cameras detect infrared radiation emitted by objects and convert it into visible images representing temperature variations. Mould itself doesn’t generate heat, but the moisture that supports mould growth creates thermal anomalies that become visible through infrared imaging. The importance of Use Thermal Imaging For Mold Detection is evident here.
The science behind how to use thermal imaging for mould detection revolves around water’s thermal properties. Water has higher thermal capacity than most building materials, meaning it absorbs and releases heat more slowly. When moisture accumulates in walls, ceilings, or floors, these areas will appear cooler or warmer than surrounding dry materials depending on environmental conditions. In Dubai’s climate, where indoor-outdoor temperature differentials can exceed 20°C, these anomalies become particularly pronounced. Understanding Use Thermal Imaging For Mold Detection helps with this aspect.
Successful application of how to use thermal imaging for mould detection requires recognising that you’re identifying potential problem areas rather than confirming mould presence. Thermal imaging serves as an excellent screening tool that directs you to locations requiring further investigation through moisture meters or surface sampling. This technology becomes particularly valuable for detecting hidden mould behind finished surfaces where visual inspection would require destructive testing. Use Thermal Imaging For Mold Detection factors into this consideration.
Use Thermal Imaging For Mold Detection: Essential Equipment Selection
Selecting the right equipment is crucial for learning how to use thermal imaging for mould detection effectively. Thermal cameras range from basic models costing around AED 3,500 to professional-grade units exceeding AED 35,000. For serious DIY enthusiasts in the UAE, I recommend investing in a camera with at least 160×120 resolution and thermal sensitivity of 0.10°C or better. This relates directly to Use Thermal Imaging For Mold Detection.
When considering how to use thermal imaging for mould detection, camera features matter significantly. Look for models with manual temperature range adjustment, multiple colour palettes, and spot temperature measurement capabilities. The ability to capture both thermal and visual images simultaneously (MSX or picture-in-picture technology) greatly enhances documentation and analysis. Many modern thermal cameras also include moisture measurement algorithms specifically designed for building inspections. When considering Use Thermal Imaging For Mold Detection, this becomes clear.
Beyond the camera itself, proper how to use thermal imaging for mould detection requires supplementary equipment. A professional-grade moisture meter (AED 800-2,500) is essential for verifying findings from thermal scans. Digital hygrometers for measuring relative humidity (AED 200-600) and infrared thermometers for spot checking surface temperatures (AED 300-800) complete your diagnostic toolkit. For documentation, consider tripod mounts and reporting software that facilitates before-and-after comparisons. The importance of Use Thermal Imaging For Mold Detection is evident here.
Use Thermal Imaging For Mold Detection: Pre-Inspection Preparation Steps
Proper preparation significantly impacts your success in how to use thermal imaging for mould detection. Begin by creating appropriate thermal conditions within the building. In Dubai’s climate, I recommend conducting inspections during early morning hours when outdoor temperatures are lowest, maximizing the temperature differential between indoors and outdoors. Ensure HVAC systems have been operating consistently for at least 24 hours before inspection. Understanding Use Thermal Imaging For Mold Detection helps with this aspect.
Environmental control represents a critical aspect of how to use thermal imaging for mould detection. Adjust thermostat settings to maintain at least 5°C difference between indoor and outdoor temperatures—this differential enhances thermal contrast that reveals hidden moisture. Close all windows and exterior doors at least four hours before scanning to stabilize interior conditions. Avoid inspections immediately after rainfall or during periods of high humidity when condensation patterns might create false positives. Use Thermal Imaging For Mold Detection factors into this consideration.
Documentation preparation completes your how to use thermal imaging for mould detection setup. Create a floor plan showing scan locations and reference points. Establish baseline temperature measurements in known dry areas for comparison. Set your camera to appropriate temperature range based on expected conditions—typically -10°C to 50°C for building inspections in the UAE. Calibrate your equipment according to manufacturer specifications and ensure batteries are fully charged for uninterrupted scanning. This relates directly to Use Thermal Imaging For Mold Detection.
Proper Scanning Techniques and Methods
Mastering scanning technique is essential for effective how to use thermal imaging for mould detection. Begin with systematic room-by-room examination, maintaining consistent distance from surfaces—typically 1-2 metres for walls and ceilings. Move the camera slowly in overlapping patterns, paying particular attention to corners, edges, and areas around plumbing fixtures where moisture intrusion commonly occurs. When considering Use Thermal Imaging For Mold Detection, this becomes clear.
Understanding perspective and angle dramatically improves how to use thermal imaging for mould detection. Scan surfaces perpendicularly whenever possible to avoid distortion and inaccurate temperature readings. For walls, maintain the camera at approximately chest height and scan in vertical strips from floor to ceiling. For ceilings, use a tripod to maintain steady positioning and avoid angled shots that compromise measurement accuracy. Document any anomalies with both thermal and visual images for later analysis. The importance of Use Thermal Imaging For Mold Detection is evident here.
Advanced how to use thermal imaging for mould detection involves comparative scanning techniques. Capture reference images of known dry areas in similar materials and conditions. Perform differential scanning by comparing opposite sides of walls or symmetrical spaces. Utilize time-delay scanning to capture thermal changes over 15-30 minute intervals, which can reveal evolving moisture patterns. These techniques help distinguish between persistent moisture issues and temporary temperature variations. Understanding Use Thermal Imaging For Mold Detection helps with this aspect.
Interpreting Thermal Images Correctly
Correct interpretation separates professionals from amateurs in how to use thermal imaging for mould detection. Thermal anomalies appear as areas of contrasting colour indicating temperature differences. In air-conditioned Dubai buildings, moisture typically appears as cooler spots since water absorbs heat from surrounding materials. However, in heating conditions or with radiant heat sources, moist areas may appear warmer due to water’s heat retention properties. Use Thermal Imaging For Mold Detection factors into this consideration.
Contextual analysis proves crucial in how to use thermal imaging for mould detection interpretation. Consider building materials—concrete, gypsum board, and wood have different thermal properties and moisture retention characteristics. Evaluate patterns—linear anomalies often indicate plumbing leaks or structural gaps, while circular patterns suggest point sources like roof penetrations. Assess magnitude—temperature differences exceeding 1-2°C typically indicate significant moisture presence requiring further investigation. This relates directly to Use Thermal Imaging For Mold Detection.
Avoid common pitfalls in how to use thermal imaging for mould detection interpretation. Reflective surfaces can create false readings—look for reflective patterns that mirror heat sources. HVAC airflow can create temperature variations unrelated to moisture—observe register locations and airflow patterns. Solar loading affects exterior walls differently throughout the day—note inspection timing and sun exposure. Electrical components and insulation variations also create thermal patterns that inexperienced users might misinterpret as moisture issues. When considering Use Thermal Imaging For Mold Detection, this becomes clear.
Dubai-Specific Considerations and Climate
Dubai’s unique climate demands specialised approaches to how to use thermal imaging for mould detection. Our extreme humidity levels—often exceeding 90% outdoors while interiors maintain 40-50% RH—create significant vapour pressure differentials that drive moisture into building assemblies. The constant air conditioning necessary for comfort creates perfect conditions for condensation on cold surfaces, particularly around thermal bridges in building envelopes.
Construction practices in the UAE significantly impact how to use thermal imaging for mould detection. Many buildings feature concrete construction with plaster finishes that behave differently than framed construction common in temperate climates. The widespread use of marble and ceramic tiles affects thermal transfer and moisture evaporation rates. Understanding these material properties helps interpret thermal patterns specific to Dubai construction when learning how to use thermal imaging for mould detection.
Seasonal variations affect how to use thermal imaging for mould detection in Dubai. Winter months (November-February) often provide optimal conditions due to greater indoor-outdoor temperature differentials. Summer months (June-September) present challenges due to minimal temperature differences between air-conditioned interiors and humid exteriors. The shoulder seasons offer varying conditions that require adjustment of scanning techniques and interpretation criteria based on current environmental factors.
Limitations and Supplementary Testing
Understanding limitations is crucial for proper how to use thermal imaging for mould detection. Thermal imaging cannot confirm mould presence—it only identifies moisture conditions conducive to mould growth. False positives occur from non-moisture related temperature variations, while false negatives can happen when moisture temperatures match surrounding materials. Surface finishes like thick paint or vinyl wallpaper can mask underlying moisture issues from thermal detection.
Supplementary testing completes the how to use thermal imaging for mould detection process. Use moisture meters to verify findings—non-penetrating meters for finished surfaces and penetrating probes where appropriate. Conduct visual inspection of accessible areas behind access panels or through borescope examination. Collect surface samples using tape lifts or swabs for laboratory analysis when mould confirmation is necessary. Air sampling helps determine if detected moisture issues have led to airborne contamination.
Professional correlation enhances how to use thermal imaging for mould detection accuracy. In complex cases, consider involving certified professionals who combine thermal imaging with comprehensive building science knowledge. Our laboratory at Saniservice regularly correlates thermal findings with microbiological analysis, revealing that approximately 70% of moisture anomalies detected thermally show active mould growth upon verification. This correlation helps refine interpretation criteria for Dubai-specific conditions.
Expert Tips for Successful Detection
Through years of refining how to use thermal imaging for mould detection, I’ve developed several expert techniques that significantly improve accuracy. First, establish baseline conditions by scanning known dry areas of similar materials before investigating suspect areas. This reference helps distinguish normal thermal variations from actual anomalies. Second, use multiple colour palettes—ironbow and rainbow often highlight subtle differences better than grayscale for moisture detection.
Third, implement time-based scanning when learning how to use thermal imaging for mould detection. Capture images of suspect areas at 5-minute intervals over 30 minutes—persistent patterns indicate genuine moisture issues while transient patterns suggest environmental factors. Fourth, combine thermal imaging with building moisture mapping—create diagrams showing moisture movement pathways based on construction details and leakage points. This systematic approach reveals interconnected moisture issues that isolated scanning might miss.
Fifth, document everything meticulously when practicing how to use thermal imaging for mould detection. Record environmental conditions (temperature, humidity, HVAC status), camera settings, and scan locations. This documentation enables repeatable inspections and trend analysis over time. Finally, recognise when to call professionals—complex cases involving structural issues, extensive contamination, or health concerns require experienced intervention beyond DIY capabilities.
FAQ: Common Questions Answered
Can thermal imaging directly detect mould?
No, thermal imaging cannot directly detect mould. It identifies temperature variations caused by moisture, which often indicates conditions suitable for mould growth. Confirmation requires supplementary testing through moisture meters or laboratory analysis of samples.
What temperature difference indicates moisture problems?
Temperature differences of 1-2°C typically indicate significant moisture issues in building materials. However, interpretation requires considering material type, environmental conditions, and pattern consistency rather than relying solely on numerical thresholds.
How much does thermal imaging equipment cost in Dubai?
Professional-grade thermal cameras suitable for mould detection range from AED 12,000 to AED 35,000 in Dubai markets. Entry-level models start around AED 3,500 but offer limited resolution and sensitivity for building diagnostics.
Can I use smartphone-attached thermal cameras?
While smartphone thermal attachments (AED 1,500-4,000) can detect gross temperature variations, they generally lack the resolution and sensitivity required for reliable how to use thermal imaging for mould detection in building materials.
How often should thermal inspections be conducted?
For preventive monitoring in Dubai’s humid climate, I recommend annual thermal inspections before the summer season. Following water events or construction work, immediate inspection helps identify moisture issues before mould develops.
Mastering how to use thermal imaging for mould detection requires understanding both the technology and the building science principles behind moisture dynamics. While thermal cameras provide powerful non-invasive detection capabilities, they represent just one tool in comprehensive moisture assessment. The most effective approach combines thermal imaging with moisture verification, visual inspection, and when necessary, professional laboratory analysis.
In Dubai’s challenging climate, where hidden mould problems affect countless buildings, proper how to use thermal imaging for mould detection techniques can prevent extensive damage and health issues. Remember that thermal imaging identifies potential problems rather than confirming them—always verify findings through additional testing before undertaking remediation. When in doubt, consult with professionals who combine thermal imaging expertise with microbiological verification capabilities. Understanding Use Thermal Imaging For Mold Detection is key to success in this area.
JV de Castro, IAC2
JV de Castro is the Chief Technology Officer at Saniservice, where he leads innovation in indoor environmental sciences, IT infrastructure, and digital transformation. With over 20 years of experience spanning architecture, building science, technology management, digital media architecture, and consultancy, he has helped organizations optimize operations through smart solutions and forward-thinking strategies. JV holds a Degree in Architecture, a Masters of Research in Anthropology, an MBA in Digital Communication & Media, along with certifications in mold, building sciences and advanced networking. Passionate about combining technology, health, and sustainability, he continues to drive initiatives that bridge science, IT, and business impact.


Leave a Reply